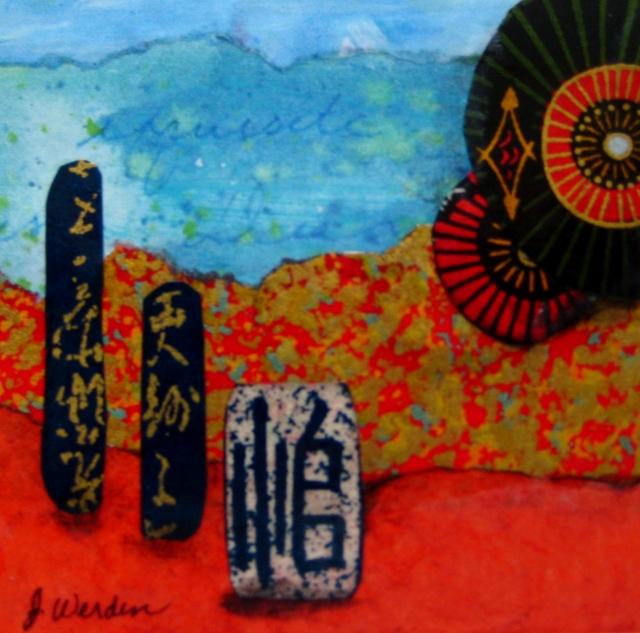
Sunday, January 24, 2016

Day 24 Before She Flew

Before She Flew
Collage 6 X 6

The text that I found gave me the title. It's nice to have that taken care of because sometimes it's hard to come up with a title. This collage has some interesting paper sources. the image on the left was a copy of some paint left over on a disposable palette paper. It was interesting, so when it was dry I made a color copy of it and prepared it for collage by coating the copy with gloss medium. The lower brown piece is a cone coffee filter. I love the texture of the seam. Above that is some painted tissue, the music and more painted tissue. The bird is a copy of one that I found in my stash, the text from a book of poetry that was painted and the top piece from a Geli Plate print. The papers are made up ahead of time, most of them months ago, then I look through them to decide what will make up my collage. There's more to it than meets the eye. 

Saturday, January 23, 2016

Day 23 Attitude

Attitude
Collage 6 X 6

While digging through my papers I came across one that I had made on a Geli Plate. I made a copy of it, not wanting to use up the original. It had this quote on it about attitude which is always a good reminder. Sometimes one must do an attitude check up and do some adjusting. I call myself Joyful Artist, not Grumpy Artist although some days the later would be more appropriate. Truthfully, I'm more joyful making art than when doing just about anything else. Like anything, it's a choice, any attitude is. 
Other papers used were painted tissue, altered magazine pages, packaging and printed papers; I also used acrylic and Inktense. 

Friday, January 22, 2016

Day 22 A Happy Place

Beach Palm
Collage 6 X 6


Whenever I need to get away either physically or mentally I go to "my happy place". It's usually a nice beach with a palm tree for a little shade, a gentle surf, and no crowds. Lucky for me I live a short ride from such a place except I'm likely to find it's not at all secluded, especially this time of year. It's OK, there's plenty of room for everyone. This collage is made from painted tissue and copy paper, the inside of a security envelope and acrylic paint and gloss medium. 

Thursday, January 21, 2016

Day 21 Love Letters

Love Letters
Collage 6 X 6

It's getting to be that time of year again when I start thinking of Valentines to design. Of course they've been in the stores since the end of Christmas but that's not me. This one is different with the black lacy heart, but black lace is supposed to be sexy isn't it? I found an old letter from a friend that had in it, "I wept through the whole thing," It made me think of watching my grown children getting married. I can't say I wept but I may have brushed away a tear or two. The rest of the papers are from printed material. Everything is sealed with gloss medium and on a #140 substrate. 

Wednesday, January 20, 2016

Day 20 Breathe

Breathe
Collage 6 X 6

January is 2/3 finished and so am I! Only 10 more to go, I still have ideas and paper so I will forge ahead. In the meantime I have to remember to breathe! Stop and take a big breath, stretch and remember to have fun. Even when you love what you're doing you can tense up and forget to fly. Two butterflies are encased, one is flying free. Fly free and enjoy your day.

Tuesday, January 19, 2016

Day 19 Strata

Strata
Collage 6 X 6

This is another piece with a calm color scheme. It still has the hand painted copy paper and the altered magazine pages like yesterday's collage but this one also has a piece of painted and stamped tissue in the middle which gives it the translucent look. I added the blue-green stamping for more interest. As always with my collages everything is coated with gloss medium before it is heat fused to the 140# substrate. Acrylic is added to the torn edges and then the piece is sealed with more gloss medium. When it has had time to cure I will coat it with acrylic UV varnish. It can be mounted on a wood or canvas panel or matted and framed. 

Monday, January 18, 2016

Day 18 Organic

Organic
Collage 6 X 6

This collage is made with hand painted copier paper and altered magazine pages. I like the quiet neutral background of the hand painted paper and the organic shapes and patterns in the altered papers. I also like the contrast between the sharp cut edges and the fluid torn edges. I think this is going to be one of my favorites. 

Sunday, January 17, 2016

Day 17 Under Construction

Under Construction
Collage, 6 X 6

While driving down the street close to my home I looked over at a building being constructed. The grey cinder block and scaffolding made a grid pattern with a cloudy grey background. The workers all over the building were wearing bright neon green or orange shirts. It was quite a contrast to the dull background. I thought I'd try to make a collage using that idea. I found I was rather limited in my selection of neon green but these book pages were close. It was one of those times when you say, "Why don't I have my camera with me?" But, maybe it's better to go with your imagination and memory. 

Saturday, January 16, 2016

Day 16 Vortex

Vortex
Collage, 6 X 6

Vortex is done in the  confined space composition style. It's another type of composition that I don't attempt very often. These 30 day works give me a chance to experiment once in awhile with things that are not tried a tried and true. The background is brown paper bag on which I have rubbed some gold acrylic paint. The collage itself is made up of tissue paper that has been hand painted randomly with gesso, acrylic paint, and gloss medium. There are a couple of small pieces of acrylic skin as well. All things that I wanted to try and see how well they would heat fuse. Most of it did pretty well. It was a fun exercise.

Friday, January 15, 2016

Day 15 It's Party Time

It's Party Time
Collage, 6 X 6

I'm half way though the month and the 30 day challenge. That's one reason to party. It's Friday night, the sun came out after a 2.5 inch downpour with tornado warnings, somewhere it's someone's birthday, anniversary, or promotion. What are your reasons to party?  I think this collage has potential to be one of my greeting/note cards. I may jazz up the black, it looks a little somber for the message but otherwise I like the color scheme.
Party's over, it's time to get back to the desk and start another collage for tomorrow.

Thursday, January 14, 2016

Day 14 Dance Like No One is Watching

Dance Like No One is Watching
Collage 6 X 6

I think this one will make a fun note card or birthday card. There's nothing quite as exhilarating as putting on your favorite music and dancing your feet off, even if you don't dance well. It releases anxiety, tension and stress and I, for one, don't do it enough. Children do it with abandon and don't care who watches or how good they are. As artists I think we need some of that freedom to express ourselves through whatever medium we choose. So, not only dance, but paint, color, cut and paste, or draw like no one is watching, looking or judging. 

Wednesday, January 13, 2016

Day 13 Ancient Message

Ancient Message
Collage 6 X 6

Day 13, It's a busy week but I am able to keep up and I'm enjoying the challenge. I started this as a type of composition known as "containment, contraction, expansion". The top is contained, there is a narrow area and then the bottom is expanded. That is an invitation to me to add little embellishments inside the expansion. I'm not sure why I chose 4 when usually there are an odd number of items in a good composition. I  think it works, I was going on intuition and not thinking about it too much. Hey, it's supposed to be fun, isn't it?

Tuesday, January 12, 2016

Day 12 Before They Hatch

Before They Hatch
Collage 6 X 6

The faint image of the egg in the left quadrant of this piece sent me looking for some images of eggs in a nest. The way it is placed reminds me of a package with a ribbon around it. A good thing to remember in the future. I can see how doing a piece every day is a learning experience. You are challenged to make art that is a little different each time and I'm willing to go out on a limb and try something different. 

I did a three hour class with some women who were interested in the process of making a heat fused collage. They had a good time looking through my scrap box and putting together 3 X 3 collages. Below is a collage of their work. The one on the lower left is my demo collage.

Monday, January 11, 2016

Day 11 A Red Line

A Red Line
Collage 6 X 6

The days are flying by. I hope I can keep up with my busy schedule this week. This collage has mostly the painted tissue in it so I coated it with gloss as soon as it was done so that I wouldn't rub away any with the shading acrylic. I did a little stamping with gold but you can barely see it because the lettering on the stamp is so small. In fact, I only see it because I know it's there. Can anyone else see it? 
We had a tornado touch down in town this week end. I'm blessed to be out of the area that was hit and our little art league is OK, too. I feel badly for those who were in the path; some homes are badly damaged as well as boats, cars and other possessions. I pray for swift actions on the part of insurance companies, repair people and contractors for the sake of those who were affected.

Sunday, January 10, 2016

Day 10 Perhaps Another Night

Perhaps Another Night
Collage 6 X 6

Sometimes you just seem to find the perfect piece of paper like the one on top with the big round white circle and the blue streaks coming up. I have a moon already in the paper! Or is it a view of the earth from the moon? The viewer can make up his/her own story. 

Saturday, January 09, 2016

Day 9 Dancin" To the Music

Dancin' To the Music
Collage, 6 X 6

It was the acrylic transfer of the figure that inspired this one. I'm not sure where this figure came from but I've wanted to use it for a long time. It's such a simple graphic but looks so joyful it needed joyful colors and some playfulness. Nothing serious going on around here. 
I also learned a good lesson. The painted tissue, which is what the dancer is on, is very thin and fragile. When I put the dark shading on the collage I wipe it away with a baby wipe. On most papers I can get pretty vigorous with the wiping; not on the tissue. From now on the tissue gets and extra coat of gloss acrylic before the shading so won't get rubbed away. I had to do a little patching on this where I rubbed to vigorously. 
A friend contacted me and wanted to buy the collage "Night", so I have priced them at $40.00 each, unmounted, plus shipping. 
Thanks for all the wonderful comments! 

Friday, January 08, 2016

Day 8, Cool In Blue

 
Cool In Blue
Collage, 6 X 6

The swirly blue paper is a copy of some paper that a friend brought to me from Italy. I can't bear to tear it up so I copied it on my printer so that I would feel OK using it. The green corners are altered magazine pages, the solid blue is painted and glazed tissue and the script is printed tissue paper, another favorite.
Thanks to everyone who has made comments on my earlier posts. They are appreciated!

Thursday, January 07, 2016

Day 7 Gold Hills

Gold Hills
Collage 6 X 6

The inspiration for this piece was the yellow gold paper. It's a hand molded paper that was originally white and I painted it with quinacridone gold, one of my favorite colors. I really like all the texture in that paper! The blue, green and cream papers are commercially printed and the brown is a packaging paper. I find that I'm saving just about everything. Soon I'll need a warehouse. It's so much fun to have a variety of papers to work with. All of them have been coated on both sides with acrylic gloss medium and heat fused to a piece of 140# paper. All my collages can be framed, fused to gallery wrapped canvas or a cradled board. They are sealed with UV varnish.

Wednesday, January 06, 2016

Day 6, Night

Night
Collage, 6 X 6

The inspiration for this was the title of a poem that I had torn off. I looked through my papers for something that was dark but interesting. I found this tissue that had been painted with a gloss medium and acrylic paint mixture. I chose pieces of that for the whole collage and added the calligraphy piece and a gold moon as the only other papers. It leaves a lot for the imagination to work on.

Tuesday, January 05, 2016

Day 5 Nevermore

Nevermore
Collage 6 x 6

This collage and I made friends right away. It was one of those pieces that went together easily and told me what was needed. Some days I think there really is such a thing as a "muse". When finished, it made me think of the poem I learned in childhood; I don't remember much but the line, "Quoth the raven, nevermore". Was it Edgar Allen Poe? I think it was rather dark and spooky. Nothing spooky about this guy, he just likes saying, "Nevermore."
The collage is made from hand painted papers, altered magazine pages, printed papers and stamped paper coated with acrylic and heat fused. Finally, coated with UV varnish.

Monday, January 04, 2016

Day 4, Fleur de Lis

Fleur de Lis
Collage/Mixed Media 6 X 6

This little collage and I aren't friends yet. I'm a not sure about it because it feels unfinished. I'm thinking the fleur de lis needs to be black which will be hard to do because it is already fastened to the collage. I like the color combinations with the neutral grey in the middle, the strings from the string paper is interesting, perhaps they need trimming; but once I do that I can't go back. Maybe it needs more circles.
These are all the questions I ask myself before I let go of a piece I am working on. Some of them almost fly together and are done before I know it, others seem to take awhile; just like any other piece of art whether it's a painting or a drawing. These little daily works are good practice for me, I'm loving giving myself permission to make one every day. 
I used hand painted paper and tissue, printed envelope, altered magazine and a copy of Italian marbled paper. They have been coated with gloss medium, fused to a watercolor substrate and coated with UV varnish ready to frame.

Sunday, January 03, 2016

Day 3, Grow An Old Friend

Grow An Old Friend
Collage/Mixed Media 6 X 6 

As I look through my collection of papers I look for things that spark the ideas that will make up the collage. One of my papers has different sayings about friends and friendships. This one was the spark I needed for another collage. "It takes a long time to grow and old friend." What else takes a long time to grow but a tree? Not only does it take a long time, for both but also patience, nurturing, and the investment  of  resources. Some of my old friends are still in my life, strong and steadfast as a tree. We've grown together and weathered storms and seasons. I am grateful.

I used altered magazine pages and printed papers fused to 140 lb. watercolor paper; all sealed with acrylic gloss medium and UV varnish ready for a frame. 

Saturday, January 02, 2016

Day 2 of the 30 Day Challenge

Let's Eat
Collage/Mixed Media 6 X 6

This seems to be the theme of the last couple of weeks. Everything around the holidays seems to revolve around food and my waistline is showing it. It's time to collage instead of eat, which will suit me just fine. My husband may not like it very much, though. 
This collage has painted tissue, security envelopes, and printed papers along with acrylic paint, and ink. I think it would look cute in a kitchen. 
Keep the comments coming, I read and treasure every one. Thanks.

Friday, January 01, 2016

First Collage of the Year

In the Pink Collage
6 X 6 

I'm participating in the 30 Paintings in 30 Days Challenge. I'm choosing to "paint" with my papers. I may mix it up with some watercolors, too, in the future. There are so many things that can distract a home artist from making art, but when there's a deadline, I put the chores and distractions on hold and get into the studio. 

Today I was attracted to the hounds tooth check and thought that pink would be the perfect companion to it. The check is a printed paper, the solid pink and black are painted tissue, the script is from a printed paper, the poppy is copied from a napkin, and the grey crosshatch is a security envelope. Everything has been coated with gloss medium and heat fused to make a smooth piece of art. I did some outlining with a pen, shadowing with acrylic paint and coated the collage with UV varnish.

Monday, December 28, 2015

A Collage and A Goal


Code Red
Mixed Media Collage
12 X 12, Mounted on wood panel

This is my latest large collage which was completed before Christmas but was put aside because of all the activity of the season. My blogging this year has been spastic to say the least but my goal for 2016 is to post a blog at least once a week. I don't like resolutions, I prefer a goal, it sounds less daunting to me. 
In this collage I used manufactured papers, altered National Geographic paper, and a marbled paper which I made in a class a long time ago. Sometimes you find a hidden treasure in the piles of stuff that you accumulate as an artist. All of it was coated with acrylic gloss medium, and heat fused. It's been mounted to a wood panel with a 3/4" cradle painted black. It has been coated with satin UV varnish and is ready to hang.
I have signed up for another 30 Paintings in 30 Days Challenge which starts on January 1. This will be interesting since I am also teaching 3 mini collage classes in January, participating with my husband in a show at at local theater, and preparing for our annual sale in February. Nothing like starting the year out with a bang! 
A very HAPPY NEW YEAR, 2016; I pray for peace, health and prosperity for all. 

Monday, November 30, 2015

Small Collages

Seashell Collage
4.5 X 3.5

Our art association has a category called Small World in their annual art show in February. We are allowed to enter 4 pieces in this category so I am busy  making 4 new pieces. If I put it off too much it will never get done in the bustle of Christmas. I may enter this one along with the Oriental Expressions that I have already posted. I have several to choose from and will post more as I get them photographed. 
My next project is to finish designing my Christmas card for this year. Time is flying!

Thursday, November 19, 2015

Mounted Watercolor

Plumeria 
Watercolor 10.5 X 10.5,
mounted on 12 X 12 gallery wrapped canvas

Robert Burridge sends out a weekly email letter called "Bob Blasts". This week's video showed how to mount a watercolor painting on a gallery wrapped canvas. I decided to give it a try. I confess I cropped an older watercolor, punched up the colors on it and found a canvas that would fit. I'm very happy with the results. I painted the canvas with a buff acrylic and gave the painting several coats of spray fixative. When the fixative was dry I coated the painting with a matte UV varnish. I used soft gel medium to adhere the painting to the canvas, cleaned the edges with a baby wipe (invaluable studio tool) and placed it upside down on a plastic sheet. I fit mat board in the back so that I could put some weights on it while it dried overnight. I decided another protective coat of UV varnish would be a good idea and I'm calling it finished. No frame, no glass, ready to hang! 

Wednesday, November 18, 2015

Mounting small collages


Oriental Expressions I and II

Since these collages are small, I decided to mount them on gallery wrapped canvas. The black background sets off the collages, I think. I used soft acrylic gel medium coated evenly on the back of the collage so that it would adhere to the canvas. I used a brayer to make sure they were firmly attached and the excess gel was removed with a baby wipe. Then I turned them over on a non stick surface and pressed them down with books. After drying everything was coated with UV varnish. The collages are 4 X 4 and the finished piece is 6 X 6, ready to enter into the next art show.

Saturday, November 07, 2015

Playful Collage

Who-ville?

I made this little collage awhile ago. The houses are from a cutout stamp that one of my students made for me. She had one of those machines that makes cutouts for scrapbooking. We used a piece of self sticking craft foam and fastened it to some cardboard to make the stamp. This was the trial run, I haven't found a use for it since but perhaps I will in the future. It reminds me of Whoville from the Grinch movies. 

Friday, October 09, 2015

The Third Collage, Oriental Expressions

Oriental Expressions 3, Umbrellas


This is the third in the series where I'm using the Japanese papers that were given me. I've been trading off between making collages and painting watercolors. The watercolor painting I'm working on is taking more time than I planned mostly because I haven't planned it. Things go so much better when I have a plan and stick to it. It's another full sheet and I'm at the stage where I'm stuck and I don't know what to do next. It's a good time to put it away and let it simmer for awhile and get out the papers for making collage.
I went to the Florida Watercolor Society convention and show last week end. I enjoy all the artists who demonstrate their style and method of painting, the trade show with too many tempting supplies at sale prices and, most of all, the show with all the wonderful artwork that made it into the exhibition. I met artist friends and rubbed elbows with the winners. I think a week end of art immersion is a very good thing!

Sunday, September 20, 2015

A Mini Collage Class


I taught a Mini Collage Class last Saturday in Sun City, FL. My long-time friend, Dixie, was instrumental in getting the class organized. There were 10 enthusiastic ladies in the class and they were a joy to work with. They got right into it and were eager to learn the process. I had the little frames that were a donation and made the paper substrate to fit each one so that the class would be able to get started right away finding their collage papers. For a warm up they all did 3 practice collages on index cards using glue sticks to fasten the papers down. That got their creative juices going so that they could put together their heat fused collages. A couple of gals had to leave early before I got a picture of their collage so there are only 8 out of 10, but they are all wonderful little compositions. The images are all between 2 x 2 to 3 x 3 inches. 

Thursday, September 17, 2015

Oriental Paper Collage

Oriental Expressions 2 Umbrellas
Mixed Media-Collage 4 X 4

This is the second collage I have completed using the Japanese paper. I love the red in these collages. It's so eye catching. This collage also has some of the envelope paper (upper right) and some specialty paper (center). These are heat fused collages that are coated with acrylic gloss medium and finished with a coat of acrylic UV varnish. 

Monday, September 14, 2015

Oriental Papers

 
Oriental Expressions 1
Collage 3.5 X 4.5

I'm finally back to blogging after a very busy summer. We had 3 trips to Minnesota and one to Oregon and back. My suitcase really got a work out and so did I! 
A long time ago a friend who had lived in Japan gave me some scraps of decorative paper that she had used to cover boxes. They are quite beautiful and have been a treasure in my paper collection but it's time that they are used. So I coated some of them with gloss and have begun a series of collages with them. Since most of the pieces of paper are small, the collages will be small. This is my first which I mixed with hand painted tissue (the light red), marbled paper ( black) and security envelope (lower right corner). I'm enjoying the challenge of working with the colors and patterns in these papers.

Sunday, August 09, 2015

Finally Finished!

Elephant on Masa paper
Watercolor 28 X 20

I've been working on this for a long time. Full sheet paintings take me a little longer and I wanted to take my time enjoy the process, and watch what happened as I added color to the slight texture of the Masa paper. I had very little wrinkling in it when I applied it to the watercolor paper and I liked working on it a lot. I used several references in order to get the detail in the eyes and the rest of the body. I wanted to emphasize the head and let the body just fade into soft edges. 
  
I haven't come up with a good title for it yet. If you have any suggestions please write them in the comments. 

Monday, July 27, 2015

Summertime Slow Down

Matlacha Mangroves
Watercolor on Masa paper, 10 X 14

It's hot, it's rainy, it's summertime in Florida. It's a good time to slow down and take it easy. A time to travel to cooler places and it you can't do that, you stay inside and read, play on the internet and maybe paint a little. I've been doing very little painting but the elephant painting is coming along. I'm taking my time with it and enjoying the process. There is no pressure of a deadline of a show to enter. 
I enjoy working on the Masa paper because sometimes the painting just seems to paint itself, especially if you do a landscape. You wet the paper and then crinkle it leaving a little space that's not crinkled; then you smooth it on an absorbent surface like a towel or piece of felt. The next step is to lightly wash over the wrinkled areas with a soft brush and India ink, black, brown or both as I did. It's glued to watercolor paper using a special flour based wallpaper paste and a brayer to get a good adhesion. At this point I let it dry, but you could continue to work on it. I wasn't going for mangroves but that's what appeared when I started to add color. 

Monday, June 22, 2015

Summer Painting

Elephant Herd 
Watercolor 4 X 6

This summer I've been taking a watercolor class that had me out of my comfort zone for the month of May. We were working on a still life set up which is not one of my favorite things to paint, unless it's something I'm particularly fond of. It was a struggle, I learned some things and my paintings ended up in the trash. I think I still have one unfinished one lurking somewhere. 
This month we were supposed to start on something of our own choosing. The instructor probably got tired of the whining about the still life. Since summer time is a good time to tackle a project that has been on the back of my brain for awhile, I decided to do a full sheet elephant painting on a Masa paper covered sheet of 140 pound paper. The Masa paper technique I learned a long time ago in a workshop with Chen-Khee Chee. I love the crinkled paper to work on and thought it would lend itself well to painting an elephant. 
The first thing I had to do was find some reference material and do some sketches and small color studies of elephants. This is also a way to procrastinate getting to the larger painting. The painting above is one of my practice paintings that I actually liked. I have started on the full sheet painting. I don't have a scary blank sheet anymore, but I'm taking my time and hope that it will be "blog worthy" in a week or two.

Saturday, May 16, 2015

Still Life

Still Life on the Lanai
Mixed media/collage 
16 X 16 Gallery Wrap Canvas

A still life; a moment in time captured in a painting. Our workshop with Tara Funk Grim was held on a lanai (a screened outdoor room) on the lovely island of Sanibel Florida. We were surrounded by trees, and a courtyard with birds singing and flitting about. We were visited and serenaded everyday by a cardinal. Our last day we had a set up of fruit for our still life which we could "paint" with our colored tissue in any arrangement. It was far from complete when we left class on the last day. I've been working on it, off and on, ever since. Now, I think I'm finished. The yellow table is laden with fruit with a view to the world outside. I think I can still hear the cardinal!

Tuesday, May 05, 2015

Ooops, Wrong Way!

1. Collage beginning

On the first day of the Tara Grim workshop we started with 3 colors of tissue paper, the first layer was the light blue, the second layer was the yellow connecting the light blue and the third layer was the mid-tone blue.  We were to try to make our torn tissues different sizes and shapes. I found it difficult to tear tissue in different shapes because it wants to tear with the "grain" of the paper into rectangles, cutting was the only option for me in that regard. The papers were attached to our substrates with gloss medium.


 2. Adding stamping

We carved out own stamps from a soft flexible material while the collage dried. Then we mixed up some acrylic paint and stamped over our collage. 


 3. Add contrasting elements

OK, this was the part where things started to go in the wrong direction. We were to add some contrasting elements to our collage. Granted, this was just supposed to be a fun, getting started piece, not something serious but I really didn't like my results. I needed to do something with it, I just couldn't let it sit around. So, the following week...


4. Ooops, Wrong Way!

I covered most of it over with acrylic paint and used cut out stencils to mask out the fish so that the under painting would show. I also used a shaper tool to remove the wet acrylic to make the seaweed. You can still see a lot of texture under the acrylic paint from the tissue and paper collage. I think the fish are varied and interesting from the under painting. One fish is traveling right and all the others left, which is why I named it what I did. Also because the painting took a "wrong" turn at the third step and needed a do-over. 

Friday, April 24, 2015

Collage On a Bag II, Courageous

Courageous
Collage on a paper bag

I have a special friend who is very courageous to my estimation. She has a genetic disease called CMT which is hard to pronounce and even harder to understand. It causes nerve degeneration and can progress differently in each person. My friend has been having a hard time walking the last couple of years. She has shown a lot of courage just learning to cope with her increasing disability. Everyday things which most people don't even think about, like sweeping a floor or going to the grocery store are 
major feats to her. So this is for you, Ellen, my courageous friend. (Click on the picture to enlarge the details). 

Saturday, April 18, 2015

Collage On a Paper Bag

Paper Bag Collage 1
13 3/4 X 11

I love watching Laura Lein-Svencner's videos she posts on You-tube. I watched one where she cut apart a Trader Joe shopping bag and collaged on the unprinted inside. I happened to have a bag and decided to try it myself. You have to be careful to have nice straight edges if you want your margins to look good. Otherwise, the process is the same with coating the bag with gloss medium and using a tack iron to fuse the papers to the bag. If I wish to display it, I'll need to float it in a frame. For now it's an unframed piece. 

Friday, April 17, 2015

Collage Workshop

Collage Bouquet
Mixed Media, 16 X 20

This past week end I took a workshop from a Delaware artist, Tara Funk Grim. She's an accomplished painter and collagist. She begins her collages with a light tissue paper background and adds colored tissue and other papers as she goes, using gloss medium to seal the papers to the substrate. This is different from what I've been doing with the hot iron, it is a more traditional collage. After the papers are fixed and dry she starts painting out with acrylic the areas she doesn't like and cleans up the edges of the torn papers. She will also add more papers if needed.  Her work is amazing, go to her web site at www.tarafunkgrim.com 
Be sure to click on my image to get an enlargement so you can see all the "stuff" in there. 

Wednesday, April 08, 2015

Create a Challenge

Create
Collage 10 X 10

I've been challenging myself to add more detail and interest to my collages. More layers, and more complexity. With that kind of a challenge it's hard to know when to quit. I kept adding and decided that I think it's enough. But I'm still not sure. Maybe there will be more. I like the cascading effect of the pieces coming down. It's all about learning and stretching myself to keep it interesting. I once had a teacher tell me that an artist is in the business of entertaining the viewer. Let me know if you've been entertained.
This collage is made of hand made string paper, painted tissue paper, manufactured paper, and acrylic paint. It is coated with gloss medium and protected with UV varnish.

Friday, April 03, 2015

I'll be back soon...

My computer had a nasty virus and had to be completely cleaned out with everything reinstalled. It's working good as new now thanks to a talented young computer guru. So, I'm a little behind with blogging and posting my latest artwork. Once it gets photographed and edited I'll be ready to roll again. I hope you have a wonderful Easter with the joyful news of the resurrection. He is risen!

Saturday, March 21, 2015

Little Gems

Blue and Red
Collage 3.5 X 4.5


Be Happy 
Collage, 3.5 X 4.5


I did two quick little collages with scraps from other collages. It's a good way to practice and to work on composition and design. It also teaches me which papers are transparent and provide that see-through factor. Some of the tissue and deli papers are painted thinly enough to provide that effect. I discovered that I really liked the ridged seam of a cone coffee filter that I used in the top collage. When the acrylic paint is put over that and wiped away, just enough paint stays in the ridges. I will use that again. Some other things I would change for a stronger composition. It's all part of the learning process.

Tuesday, March 17, 2015

Added the Waterfall

Scandinavian Horses with Waterfall

I debated and fiddled with it and finally decided to add the waterfall. So much of what I remember of our drive through Norway was the wonderful waterfalls coming from the top of the mountains. I also added a little more shadowing. Now I think I'll leave it alone. It's a memory piece for me that I will enjoy for awhile.

Followers